Dreaming of a spacious walk-in closet but stuck with just one room to work with? It’s a common challenge. You want the luxury and organization of a dedicated dressing area, but you also need a peaceful place to sleep. What if you could have both, without building a single wall?
It’s not just possible; it’s a brilliant design hack. Take a look at the room above. By strategically placing a single piece of furniture—a wardrobe—you can create two completely distinct and functional zones.
In this post, we’ll break down exactly how to use this wardrobe divider hack to create the closet of your dreams, right inside your own bedroom.

Why the Wardrobe Divider is a Genius Idea
Before we get into the “how,” let’s talk about the “why.” This method is more than just a clever trick; it’s a smarter way to live in your space.
- It Defines Your Zones Clearly: There’s a real psychological benefit to separating your sleeping area from the hustle of getting ready. It helps your brain switch off at night and get in gear in the morning. This simple division creates a calm sanctuary for rest and an efficient, organized hub for your wardrobe.
- It Adds Massive Storage: This isn’t just a wall; it’s a hard-working piece of furniture. You’re not sacrificing space for a divider; you’re adding an entire closet system that also happens to divide the room. It’s a win-win.
- It’s Non-Permanent & Renter-Friendly: If you’re renting or simply don’t want to commit to a permanent structural change, this is your perfect solution. There’s no construction, no dust, and you can take it with you when you move.
- It’s Cost-Effective: Think about the cost and hassle of hiring a contractor to build a new wall. A well-chosen wardrobe can achieve a similar effect for a fraction of the price and can be set up in a single afternoon.

How to Recreate This Look: A Step-by-Step Guide
Ready to make it happen? Here’s how you can replicate this smart layout.
Step 1: Plan Your Layout & Measure Everything
First, figure out where the wardrobe will go. Think about the flow of your room. You’ll want to leave enough space to walk comfortably on both sides. A good rule of thumb is to have at least 3 feet (about 90 cm) of clearance for your main pathways. Use painter’s tape on the floor to mark out the footprint of the wardrobe. This helps you visualize the space before you commit.
Step 2: Choose the Right Wardrobe
Not all wardrobes are created equal for this task. Look for a sturdy, freestanding unit. Systems like the IKEA PAX are popular for this because they are highly customizable and have options for finished back panels. If the back isn’t finished, don’t worry—that brings us to our next step. The most important thing is that it’s stable and fits your space.
Step 3: Style the “Forgotten” Side (the Back of the Wardrobe)
The side of the wardrobe facing your bed doesn’t have to be boring. This is your chance to get creative! You can:
- Paint it to match your walls.
- Apply stylish peel-and-stick wallpaper for a pop of pattern.
- Attach a thin corkboard to create a mood board or pin reminders.
- Mount a slim, full-length mirror.
This small touch makes the divider feel like an intentional and beautiful part of your bedroom decor.

Step 4: Design Your New “Walk-In Closet”
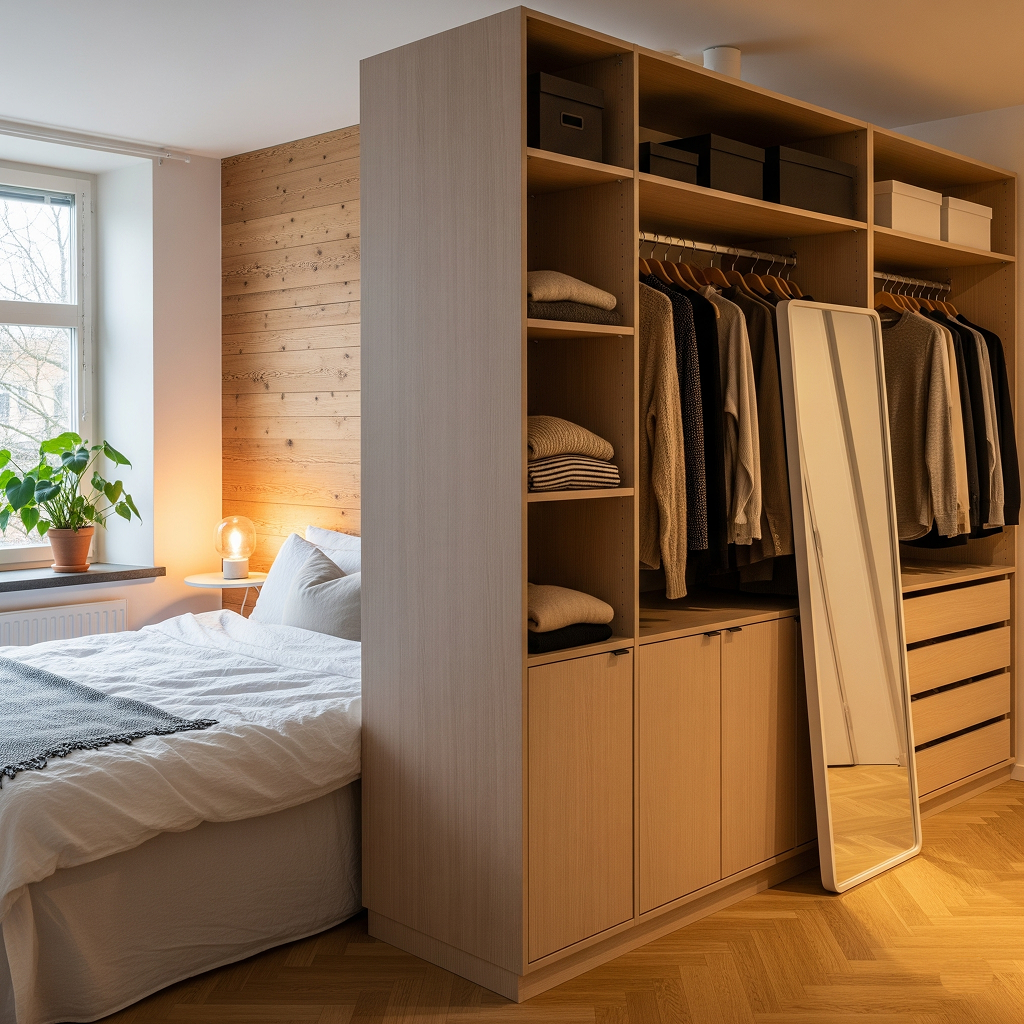
Now for the fun part. On the other side of your new wall, design your closet zone. As you can see in the inspiration photo, this space is packed with function. Install a mix of hanging rods, drawers, and open shelves to store everything from shoes to sweaters. You can even plan a spot for a clothing steamer or a small vanity table. This is your chance to build a closet that is perfectly tailored to your wardrobe.
Essential Tips for a Flawless Finish
You’re almost there. These final touches will take your new space from good to great.
- Lighting is Key: Treat the two zones as separate rooms when it comes to lighting. For the bedroom side, a soft, ambient light (like the beautiful rattan pendant in the photo) creates a relaxing mood. For the closet side, you’ll want brighter, focused task lighting. Consider installing LED strips under shelves or a track light on the ceiling so you can easily see your clothes.
- Ensure Stability: Safety first. A tall, heavy piece of furniture needs to be secure. For peace of mind, especially if you have kids or pets, anchor the wardrobe to the wall or ceiling according to the manufacturer’s instructions.
- Create Cohesion: Even though you’ve created two spaces, you want them to feel connected. Tie the room together with a consistent color palette or by using similar materials. Notice how the warm wood tones in the photo appear in the wardrobe, floors, and even the lighting fixture, creating a harmonious and cohesive look.
Final Thoughts
As you can see, creating a separate dressing room within your bedroom doesn’t require a construction crew or a huge budget. The wardrobe partition idea is the ultimate fusion of style and function. It cleverly solves the problem of limited space by transforming a single piece of furniture into a structural, storage-packed feature. So go ahead and reimagine your space—your dream walk-in closet might just be one wardrobe away.
Leave a Reply