Let’s be honest—cracked, moldy, or peeling silicone around your tub or sink is an eyesore. Beyond just looking bad, failing sealant can lead to water damage, mildew, and bigger problems down the road. The good news? Replacing it is one of the most satisfying and impactful DIY projects you can tackle.
Refreshing your kitchen silicone or bathroom silicone not only creates a clean, professional finish but also provides a durable, waterproof barrier that protects your home. This guide will walk you through every step, from removing the old gunk to applying a perfect new bead.

What is Silicone Sealant? Basic Knowledge for DIYers
So, what exactly is this stuff? A silicone sealant is a flexible, rubber-like material perfect for sealing joints in wet areas. Its primary job is to keep water out.
- Silicone vs. Caulk: While often used interchangeably, they’re different. Traditional caulk is typically acrylic-based and less flexible, ideal for filling gaps in dry areas that will be painted. Silicone is the champion for bathrooms and kitchens because it’s highly water-resistant, flexible, and withstands temperature changes without shrinking or cracking. For sinks, showers, and tubs, silicone is what you need.
When & Where to Apply Silicone in Your Kitchen and Bathroom
Knowing where to use silicone is key to preventing water damage. Focus on any joint where water could seep in.
- In the Bathroom:
– Around the base of the bathtub and shower tray.
– Where shower walls meet the tub or floor.
– Along the seams of a shower enclosure.
– Around the perimeter of your sink and vanity.
– At the base of the toilet. - In the Kitchen:
– Where the countertop meets the backsplash.
– Around the edge of the kitchen sink.
– To seal gaps between the countertop and the wall.
Tools & Materials You’ll Need
Gathering the right DIY silicone tools makes all the difference. Having everything ready before you start ensures a smooth, stress-free process.
- Silicone Sealant: Choose one specifically for “Kitchen & Bath” as it contains mildewcides.
- Caulking Gun: A standard gun is all you need.
- Utility Knife or Silicone Scraper: For removing old sealant.
- Masking Tape: Blue painter’s tape is perfect.
- Paper Towels or a Rag: For cleanup.
- Caulking Tool or Your Finger: For smoothing the bead.
- Rubbing Alcohol or Mineral Spirits: For final surface cleaning.
- Mold & Mildew Cleaner (if needed): For treating any existing mold.

Step-by-Step Guide: How to Apply Silicone Sealant Like a Pro
Ready for that perfect bead? This DIY silicone tutorial breaks it down into three simple stages.
- Prepare the Surface (The Most Important Step!)
– Clean: The surface must be perfectly clean and free of soap scum, old sealant, and debris.
– Dry: Silicone will not stick to a wet surface. Make sure the area is completely dry. Use a hairdryer if needed.
– Mask: Apply two parallel strips of masking tape to frame the joint. This is the secret to getting sharp, straight lines. The gap between the tape strips will be the width of your silicone bead. - Apply the Silicone
– Cut the Nozzle: Cut the tip of the silicone tube at a 45-degree angle. The opening should be slightly wider than the gap you’re filling.
– Load the Gun: Puncture the inner seal of the tube with a long nail or the poker on the caulking gun. Load it into the gun.
– Apply Steady Pressure: Starting at one end, pull the gun smoothly along the joint at a 45-degree angle. Apply even, consistent pressure to the trigger for a uniform bead. Don’t stop and start if you can help it. - Finish for a Pro Look
– Smooth the Bead (Tooling): Immediately after applying, smooth the silicone bead. You can use a dedicated caulking tool or your finger (dipped in a little water can help). Press gently and drag along the entire length to create a clean, concave seam.
– Remove the Tape: Pull off the masking tape immediately after tooling, while the silicone is still wet. Pull it away from the joint at an angle for the sharpest line.
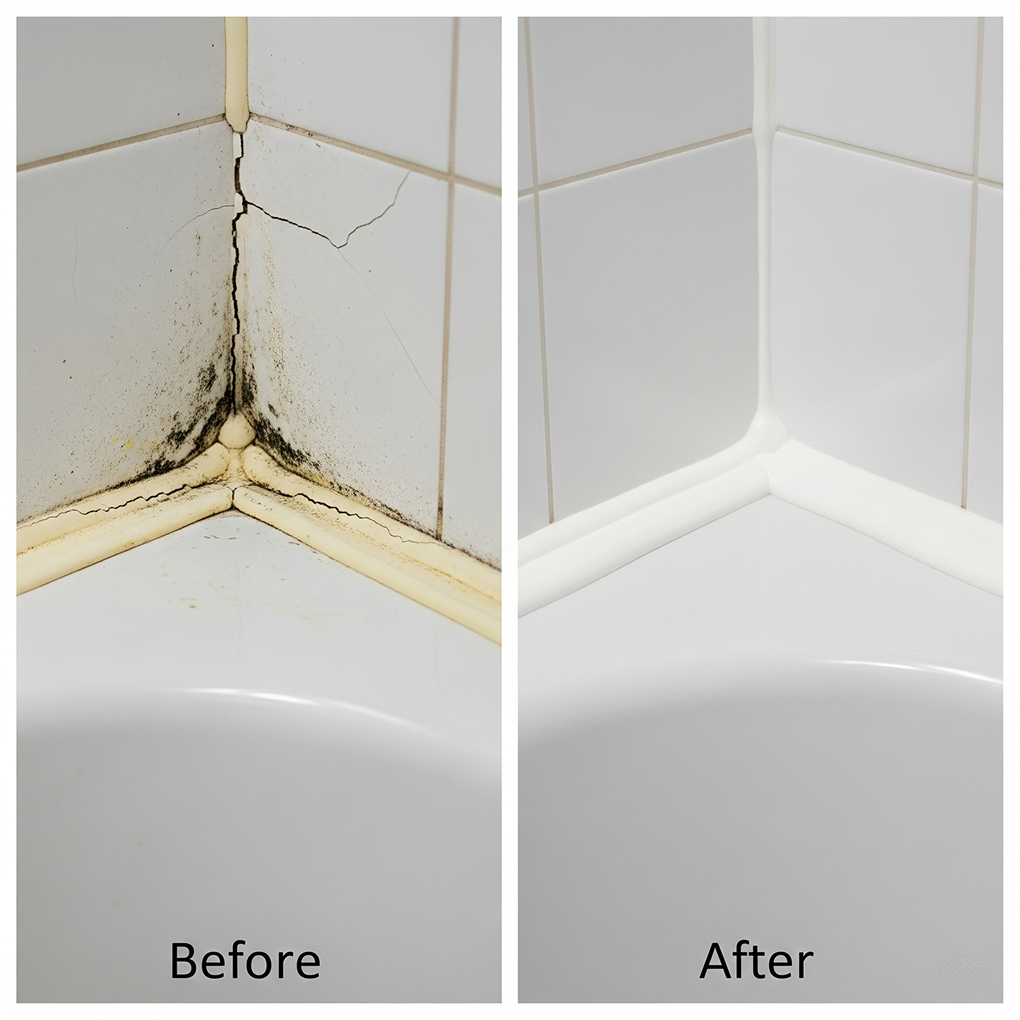
How to Remove Old or Moldy Silicone and Reapply It

If you’re dealing with existing sealant, proper removal is non-negotiable. This is a common DIY bathroom repair that makes a huge difference.
The Problem with Old Sealant: Failing or moldy silicone isn’t just ugly; it has lost its waterproof seal. Water can get behind it, causing hidden damage to your walls and floors. Moldy silicone removal is essential for a healthy home.
Step 1: Cut and Peel
- Using a utility knife or a silicone removal tool, carefully cut along both the top and bottom edges of the old silicone bead. Be careful not to scratch your tub or tiles.
- Once cut, try to grab one end of the old silicone strip and peel it away. It will hopefully come off in a long piece.
Step 2: Scrape Away Residue
- There will likely be small bits left behind. Use a scraper or razor blade (held flat) to carefully remove all remaining residue. For stubborn bits, you can use a specialized silicone remover liquid. A clean surface is critical for the new application.
Step 3: Deep Clean and Dry
- For kitchen silicone mold removal or bathroom mold, treat the cleaned area. Use a cloth with a 1:3 bleach/water solution or a commercial mold cleaner to kill any lingering spores.
- Rinse the area and let it dry completely. We mean completely—wait several hours or even overnight. Any trapped moisture will prevent the new silicone from adhering properly.
Step 4: Reapply the New Silicone
- Once the joint is clean, dry, and free of all old material, you are ready to resilicone the joint.
- Simply follow the steps in the “How to Apply Silicone Sealant Like a Pro” section above—masking, applying, and smoothing.
- After finishing, let the silicone cure. Check the product label, but most require 24 hours to become fully waterproof. Don’t use your shower or sink during this time.
Common Silicone Sealing Mistakes to Avoid
- Mistake: Applying too much silicone. It creates a mess and is hard to smooth.
- Fix: Cut a smaller hole in the nozzle and apply less pressure. It’s easier to add more than to take it away.
- Mistake: Applying to a dirty or damp surface. The silicone will peel away within weeks.
- Fix: Don’t skip the prep! Clean thoroughly with rubbing alcohol to remove soap scum and ensure the area is bone dry.
- Mistake: Waiting too long to smooth the bead or remove the tape. The silicone will form a skin and get messy.
- Fix: Work in manageable sections if you’re slow. Smooth the bead and remove the tape for that section before moving on.
Maintenance Tips for Long-Lasting Silicone Joints

Proper silicone maintenance is simple and prevents you from having to do this job again anytime soon.
- Keep it Clean: Regularly perform cleaning silicone joints with a gentle, non-abrasive bathroom cleaner.
- Keep it Dry: Good ventilation is key. Use the exhaust fan during and after showers. Wiping down the silicone seams after use also helps prevent mold growth.
- Inspect Regularly: Check your sealant every few months for any signs of peeling or mold and address it early.
Conclusion: The Payoff of a Perfect Seal
Tackling a DIY silicone application saves you money and gives you complete control over the quality of the work. With a little patience and the right technique, you can create waterproof, mold-free seals that look professionally done and protect your home for years. Grab your caulking gun—you’ve got this!
Frequently Asked Questions (FAQ)
- How long does silicone take to dry or cure? While silicone may feel dry to the touch in as little as 30 minutes to an hour, it is not fully cured. Most silicone sealants require 24 hours to cure completely and become fully waterproof. It’s crucial to avoid exposing the new sealant to any water during this period. Always check the specific instructions on the product tube, as some heavy-duty formulas may take longer.
- Can I paint over silicone sealant? No, you generally cannot paint over 100% silicone sealant. Paint does not adhere well to its smooth, flexible surface and will quickly peel or flake off. If you need to seal a gap that must be painted (like trim in a dry area), look for a “paintable” acrylic or siliconized caulk instead. For kitchens and baths, the waterproofing is more important than paintability.
- What is the best type of silicone for a shower or bath? Always choose a product specifically labeled “Kitchen & Bath” or “For Showers & Tubs.” This type of silicone contains mildewcides—special additives that inhibit the growth of mold and mildew, which is essential for high-moisture environments.
- How can I prevent mold from growing on my new silicone? Prevention is key. First, ensure you’ve completely cleaned off any old mold before applying the new sealant. After it has cured, promote good ventilation by using an exhaust fan during and after showers. Wiping down the silicone seams with a cloth or squeegee after use also helps tremendously by removing the moisture that mold needs to grow.
- I made a mess! How do I clean up wet silicone? If you accidentally smear wet silicone, act quickly! For smooth surfaces like tile or a countertop, you can carefully scrape up the excess with a putty knife. For the remaining film, wipe it away with a paper towel dampened with mineral spirits or rubbing alcohol. It’s much harder to remove once it has cured, so immediate cleanup is best.
Leave a Reply